How to Build a Deck Over a Concrete Patio Complete Guide
If you’ve ever looked at your cracked, faded concrete patio and thought, “there has to be a better option than tearing this all out” you’re right. Building a deck over a concrete patio is one of the smartest, most cost-effective ways to transform an outdoor space without the expense and mess of full demolition.
Whether you’re a seasoned DIYer or planning to hire a professional, understanding how to build a deck over a concrete patio the right way will save you time, money, and a significant number of headaches down the road.
This guide walks you through everything: from structural planning and material selection to step-by-step installation and long-term maintenance. Let’s get into it.
Can You Build A Deck Over A Concrete Patio?
Yes, in most cases, you absolutely can. The existing concrete slab acts as a stable, load-bearing foundation, which is actually a significant structural advantage. However, there are a few conditions your concrete needs to meet before you start framing:
- No major structural cracks. Hairline cracks are generally fine, but wide, heaving, or shifting cracks suggest underlying ground movement that must be addressed first.
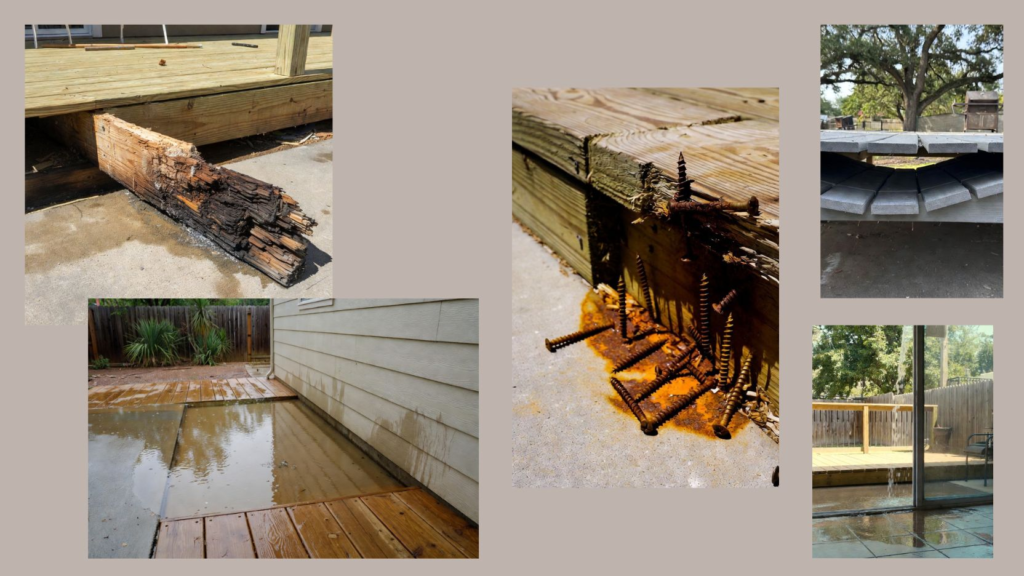
- Adequate drainage. Water must have somewhere to go. If your slab pools water, you’ll need to account for slope and drainage in your deck design.
- Clearance from the home. The finished deck surface should sit below any existing door thresholds to prevent water intrusion into your home.
According to HomeAdvisor’s outdoor remodeling data, the average cost to build a new deck ranges from $4,000 to $11,000, but building over an existing concrete slab can reduce that range considerably by eliminating excavation and concrete work.
Benefits Of Decking Over Concrete
Before diving into the how-to, it’s worth understanding why this approach is so popular among homeowners and contractors alike.
Cost savings. No demo, no hauling, no new concrete pour. The slab underneath does the heavy lifting literally.
Faster installation. Without ground prep and concrete curing time, projects move significantly faster.
Improved aesthetics. Wood, composite, and PVC decking materials offer warmth and visual appeal that plain concrete simply can’t match.
Better comfort underfoot. Decking is softer, cooler in the sun, and more comfortable for bare feet than bare concrete, a major win for outdoor living.
Increased home value. A well-built deck is one of the highest-ROI home improvement projects. Remodeling Magazine’s Cost vs. Value Report consistently ranks wood and composite decks among the top returns on investment for outdoor upgrades.
What You’ll Need: Tools & Materials
Tools
- Tape measure and chalk line
- Hammer drill with masonry bits
- Circular saw or miter saw
- Drill/driver
- Level (4-foot minimum)
- Speed square
- Safety glasses and hearing protection
Materials
| Material | Purpose |
| Pressure-treated lumber (2×4 or 2×6) | Sleepers / framing |
| Concrete screws (Tapcon) or wedge anchors | Securing sleepers to slab |
| Composite or pressure-treated decking boards | Surface finish |
| Construction adhesive (optional) | Additional sleeper bonding |
| Composite shims | Leveling sleepers |
| Joist hanger hardware | Structural connections |
| Waterproof membrane or flashing tape | Moisture protection |
Pro tip on decking materials: Composite decking (brands like Trex or TimberTech) costs more upfront but requires virtually no maintenance, resists moisture and fading, and outlasts pressure-treated wood in humid or rain-heavy climates. For a region like San Antonio with intense UV exposure and occasional heavy rains composite is a particularly smart investment.
Step-By-Step: How To Build A Deck Over A Concrete Patio
1: Assess And Prepare The Concrete Slab
Start with a thorough inspection. Walk the slab, looking for:
- Cracks wider than ¼ inch fill with a concrete patching compound and allow it to cure fully before proceeding.
- Low spots or poor drainage mark these areas; you’ll compensate with shims during framing.
- Moisture issues tape a plastic sheet to the slab for 24 hours. If condensation forms underneath, you have a moisture problem that needs a vapor barrier solution before decking.
Clean the slab thoroughly with a pressure washer and let it dry completely.
2: Plan Your Layout And Check Local Building Codes
Before cutting a single board, pull a permit if your municipality requires one. According to Angi’s contractor guidelines, most jurisdictions require permits for decks over a certain square footage or height skipping this step can create serious issues during a home sale.
Use a chalk line to map out your sleeper layout. Sleepers are the pressure-treated boards that will sit directly on the concrete and support your decking. They typically run perpendicular to the direction of your finished deck boards.
Standard sleeper spacing: 12 to 16 inches on center, depending on your decking manufacturer’s recommendations.
3: Install A Moisture Barrier
This step is critical and frequently skipped by DIYers at significant cost later. Lay strips of waterproof membrane, roofing felt, or flashing tape beneath each sleeper location. This prevents moisture from being trapped between the wood and concrete, which is the primary cause of rot in ground-level decks.
For higher-moisture environments, consider a dimple mat or composite sleepers rather than pressure-treated lumber entirely.
4: Set And Secure The Sleepers
Place your sleepers on the moisture barrier strips. Use a 4-foot level to check for flatness across the entire layout. Shim low spots as needed.
Once level, secure each sleeper to the concrete using:
- Tapcon concrete screws (easier, great for lighter applications)
- Wedge anchors (stronger, better for larger or elevated decks)
Drill pilot holes through the sleeper and into the concrete with a hammer drill. Space fasteners every 16 to 24 inches along each sleeper. Don’t skip fastening unsecured sleepers shift over time, causing your deck surface to become uneven and potentially unsafe.
5: Add Blocking And Perimeter Framing
Install blocking between your sleepers at the perimeter and at mid-span for runs over 8 feet. This provides lateral stability and prevents the sleepers from rolling or twisting a phenomenon called “joist rotation” that weakens the entire structure over time.
If your deck will run to the edge of the slab, add a perimeter band board using joist hanger hardware for clean, secure connections.
6: Lay Your Decking Boards
Now comes the most satisfying part. Starting from one edge (typically the side most visible from the home), lay your decking boards perpendicular to the sleepers.
Key installation tips:
- Leave 1/8 to ¼ inch gap between boards for drainage and expansion (composite materials especially need expansion gaps at the ends).
- Stagger end joints so they don’t all fall on the same sleeper this dramatically improves structural integrity and visual appeal.
- Use hidden fastener clips if your decking system supports them they create a cleaner look and eliminate the risk of surface screws causing board splitting or staining.
- Pre-drill near board ends to prevent splitting, especially with pressure-treated lumber.
Snap a chalk line for your final cut along the edge of the deck, then trim with a circular saw for a clean, professional finish.
7: Finish The Edges And Add Fascia
Install fascia boards around the exposed perimeter framing to give your deck a polished, finished appearance. Fascia hides the structural framing and ties the entire look together.
If your deck is elevated even slightly off the concrete, ensure the space between the decking and the slab allows for airflow and debris removal.
8: Seal Or Finish (If Using Wood)
Pressure-treated wood should be allowed to dry for 30–60 days before applying a penetrating sealer or stain. Skipping sealer accelerates graying, checking, and splitting. Apply a quality exterior wood sealer annually for maximum longevity.
Composite decking requires no sealing but benefits from an annual cleaning with a composite deck cleaner to prevent mold and mildew in shaded areas.
Deck Over Concrete: Common Mistakes To Avoid
Skipping the moisture barrier. This is the single most common and costly mistake. Trapped moisture rots sleepers from the bottom up, often invisibly, until structural failure occurs.
Not accounting for drainage slope. Your finished deck should maintain a slight slope (⅛ inch per foot) away from the house to shed water.
Using the wrong fasteners. Standard wood screws will corrode and fail. Always use hot-dipped galvanized, stainless steel, or approved composite fasteners.
Ignoring the door threshold. If your deck surface sits above an existing door threshold, water can enter your home. Always verify clearance before finalizing your deck height.
Overspacing sleepers. Wider spacing saves lumber but creates a bouncy, unstable deck surface. Always follow your decking manufacturer’s maximum span ratings.
When To Call A Professional
DIY deck installation is within reach for capable homeowners but there are situations where professional expertise is the smarter choice:
- Your concrete slab has significant cracking or heaving that may indicate foundation movement
- Your project requires permits and inspections
- The deck connects to your home’s structure (ledger-attached decks have specific code requirements)
- You’re working with significant grade changes or elevation differences
- You want custom finishes, stamped borders, or integrated hardscaping elements
If your project starts with the concrete itself, whether repairing, resurfacing, or pouring a new slab as the foundation for your future deck, working with an experienced local contractor ensures your base is structurally sound before you build.
Ready to Upgrade Your Outdoor Space in San Antonio?
At Affordable Concrete San Antonio, we specialize in building beautiful, durable outdoor spaces that are engineered for Texas conditions. From new patio slabs and concrete resurfacing to stamped concrete and custom hardscaping, our team brings over a decade of hands-on experience to every project.
With 8,000+ completed projects and 1,000+ five-star reviews, we’ve earned the trust of homeowners across San Antonio and surrounding communities.
1247 W Thompson Pl, San Antonio, TX 78226, call 713-504-2341 Email: info@affordableconcretesanantonio.com
Schedule your free on-site consultation today with no obligation, no hidden fees.
FAQs
Do I Need To Remove The Old Concrete Before Building A Deck?
No. In most cases, the existing slab serves as an ideal foundation. Removal is only necessary if the slab is severely damaged, heaving, or poorly positioned.
How Long Does It Take To Build A Deck Over A Concrete Patio?
A typical 200–400 sq ft deck over concrete can be completed in 2–4 days by an experienced crew, or a long weekend for a skilled DIYer with all materials on hand.
What Is The Best Decking Material To Use Over Concrete?
Composite decking is the top recommendation for durability and low maintenance, especially in climates with high UV exposure or moisture fluctuation. Pressure-treated wood is the most affordable option if properly sealed and maintained.
Will Building A Deck Over Concrete Trap Moisture?
Only if moisture barriers aren’t installed. Proper waterproof membrane strips beneath sleepers, combined with adequate airflow between the decking and slab, prevent moisture-related damage.
Does Building A Deck Over Concrete Require A Permit?
It depends on your local jurisdiction. Many municipalities require permits for decks above a certain size. Always check with your local building department before starting construction.