
How to Build a Patio Deck Over Concrete: Expert Guide for San Antonio Homeowners
Transforming an old, cracked, or uninspiring concrete slab into a beautiful outdoor living space is one of the most rewarding home improvement projects you can undertake. Whether you’re dealing with a deteriorating patio, an unattractive pool deck, or simply want to elevate your backyard aesthetics without the expense of complete demolition, building a deck over existing concrete offers a practical and cost-effective solution.
This comprehensive guide walks you through everything you need to know about how to build a patio deck over concrete, from initial planning and material selection to installation methods and long-term maintenance. We’ll explore both DIY approaches and professional alternatives, helping you make an informed decision that aligns with your budget, skill level, and design vision.
Why Build A Deck Over Concrete?
Building a patio deck over concrete has become increasingly popular among homeowners for several compelling reasons. The primary advantage is cost savings removing existing concrete is labor-intensive, expensive, and creates significant waste disposal challenges. According to data from HomeAdvisor, concrete removal can cost between $2 and $6 per square foot, not including disposal fees, which can quickly add thousands of dollars to your project budget.
Beyond financial considerations, existing concrete slabs provide an excellent foundation that’s already level, compacted, and stable. This eliminates the need for extensive ground preparation, excavation, and base material installation that new construction requires. The structural integrity of a well-maintained concrete slab can actually extend the lifespan of your new deck by preventing soil settling and moisture issues that commonly affect ground-level decks.
Additional benefits include faster installation timelines, minimal landscape disruption, improved drainage when properly designed, and the ability to update your outdoor aesthetic without major construction. For San Antonio homeowners specifically, leveraging existing concrete makes particular sense given the region’s expansive clay soils, which are prone to shifting and can compromise traditional deck footings.
Assessing Your Existing Concrete Slab
Before you begin planning how to build a patio deck over concrete, a thorough assessment of your existing slab is essential. The condition of your concrete directly impacts which installation methods are viable and whether additional preparation work is necessary.
Structural Evaluation Checklist
Surface Condition: Examine the concrete for major cracks wider than a quarter-inch, significant spalling (surface flaking), or areas where the concrete has completely broken apart. Minor hairline cracks are generally acceptable, but structural damage may require repair before proceeding.
Levelness and Slope: Use a long level or string line to check for proper drainage slope. Ideally, concrete should slope away from your home at a rate of one-quarter inch per foot to prevent water pooling. According to building code requirements, adequate drainage is crucial for preventing water intrusion into your home’s foundation.
Stability: Walk across the entire slab and feel for movement, rocking, or settling. Any sections that shift under weight indicate underlying soil problems that must be addressed before building over the surface.
Height Considerations: Measure the distance from the concrete surface to your home’s door threshold. Building codes typically require at least a four-inch drop from interior floor level to exterior surfaces. Adding a deck structure may bring you too close to this threshold, potentially creating water intrusion risks.
Existing Drainage Features: Identify any drains, downspouts, or grading features that channel water away from your home. Your new deck must maintain or improve these drainage pathways.
For homeowners in the San Antonio area dealing with significant concrete deterioration, professional concrete resurfacing may be a superior alternative to building over damaged surfaces. Expert contractors can restore compromised slabs to like-new condition, providing a solid foundation for future improvements.
Planning And Design Considerations
Successful patio deck construction over concrete begins with thoughtful planning that addresses both aesthetic goals and practical requirements. This phase determines your material choices, installation method, and overall project scope.
Determining Your Deck’s Purpose
How you intend to use your outdoor space significantly influences design decisions. A dining area requires a stable, level surface capable of supporting heavy furniture and foot traffic. An entertainment space might prioritize aesthetics and flow, while a pool deck demands slip-resistant materials and proper drainage solutions.
Consider furniture placement, traffic patterns, sun exposure, and privacy needs. In San Antonio’s climate, shade structures, ceiling fans, and heat-resistant materials become important factors that affect long-term enjoyment of your space.
Permit And Code Requirements
Most municipalities require building permits for deck construction, even when building over existing concrete. Permits ensure your project meets safety standards for structural loading, railing heights, egress requirements, and setback distances from property lines.
Contact your local building department early in the planning process to understand specific requirements. San Antonio and surrounding Bexar County jurisdictions have specific codes addressing outdoor structures, and permit fees typically range from $50 to $200 depending on project scope.
Climate-Specific Considerations For San Antonio
The South Texas climate presents unique challenges that must be addressed in your deck design. Intense summer heat can make certain decking materials uncomfortably hot to walk on barefoot. UV radiation causes premature fading and degradation of lower-quality materials. Occasional hard freezes, while rare, can damage improperly installed or sealed surfaces.
Heavy thunderstorms and flash flooding require robust drainage solutions. Your deck system must allow water to flow freely beneath and around the structure without creating pooling or directing water toward your home’s foundation. The region’s expansive clay soils also mean that any ground-contact components must account for soil movement.
Material Options For Deck Over Concrete
Selecting the right materials for building a patio deck over concrete involves balancing aesthetics, durability, maintenance requirements, and budget. Each option offers distinct advantages and limitations.
Pressure-Treated Lumber
Pressure-treated wood remains the most economical choice for deck construction, with material costs typically ranging from $2 to $5 per square foot. The lumber is chemically treated to resist rot, insects, and moisture damage, making it suitable for outdoor applications.
Advantages: Low initial cost, widely available, easy to work with using standard tools, accepts stains and paints for customization.
Disadvantages: Requires regular maintenance including annual sealing, prone to warping and splitting over time, can be uncomfortably hot in direct sunlight, limited lifespan of 10-15 years even with proper care.
For concrete applications, pressure-treated lumber works well when creating a sleeper system horizontal boards fastened to the concrete that elevate the deck surface and create airflow underneath.
Composite Decking
Composite materials, manufactured from a blend of wood fibers and recycled plastics, have gained significant market share due to their low-maintenance characteristics and enhanced durability. Premium brands offer 25-year warranties and realistic wood-grain textures.
Advantages: Minimal maintenance requirements, resistant to fading and staining, won’t rot or splinter, available in numerous colors and textures, retains appearance for decades.
Disadvantages: Higher upfront cost ($8-12 per square foot), can become very hot in direct sunlight, may fade slightly over time despite UV protection, requires proper ventilation when installed over concrete.
Composite decking over concrete typically requires a sleeper or deck tile system to allow air circulation and prevent moisture accumulation that can lead to mold growth underneath.
Deck Tiles And Modular Systems
Interlocking deck tiles represent the simplest DIY-friendly option for covering concrete. These snap-together squares come in various materials including wood, composite, and stone-look porcelain.
Advantages: No tools required for installation, easily removable and reconfigurable, built-in drainage gaps, perfect for renters or temporary solutions, can be installed over slightly uneven surfaces.
Disadvantages: May shift over time without proper edge securing, limited design flexibility, visible seams between tiles, generally less durable than permanently installed decking.
High-quality deck tiles from manufacturers like Kontiki or NewTechWood cost between $8 and $15 per square foot and can transform a concrete patio in a single weekend without special skills.
PVC And Vinyl Decking
Fully synthetic PVC decking offers the ultimate in weather resistance and low maintenance. Unlike composites that contain wood fibers, PVC is 100% plastic and completely impervious to moisture.
Advantages: Completely waterproof, highly stain-resistant, never requires sealing or staining, excellent color retention, won’t support mold growth.
Disadvantages: Premium pricing ($10-15 per square foot), can feel hollow or flexible underfoot, limited color options compared to composites, significant thermal expansion requires careful installation.
Professional Concrete Overlays
Rather than building a separate deck structure, decorative concrete overlays provide a transformative alternative that bonds directly to your existing slab. This approach has gained popularity in San Antonio due to its durability in extreme weather conditions.
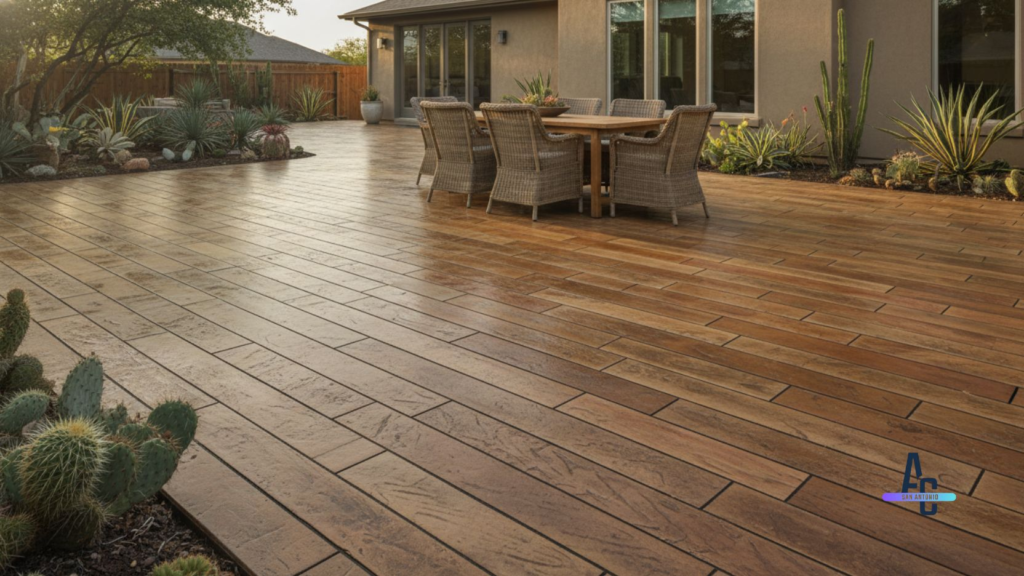
Modern stamped concrete techniques can replicate the appearance of wood planking, natural stone, or brick pavers while providing a monolithic, low-maintenance surface. According to the Concrete Network, properly installed overlays can last 20-30 years with minimal upkeep.
Professional contractors offering concrete resurfacing services can apply thin bonded toppings, micro-toppings, or stamped overlays that completely reimagine your space without the structural complications of building a raised deck system.
Step-By-Step Installation Methods
How to build a patio deck over concrete depends largely on your chosen materials and the condition of your existing slab. Here are the three primary installation approaches.
Method 1: Sleeper System Installation
The sleeper method involves fastening pressure-treated 2×4 or 2×6 boards directly to the concrete, creating a framework for attaching deck boards. This traditional approach works well for level slabs in good condition.
Step 1: Plan Your Layout
Determine your deck board orientation (parallel or perpendicular to your home) and plan sleeper placement accordingly. Sleepers should run perpendicular to your finished deck boards and be spaced 12-16 inches apart for standard deck boards.
Step 2: Prepare The Concrete
Clean the concrete thoroughly, removing all dirt, oil, and debris. Repair any significant cracks or damage. Apply a concrete bonding primer if you plan to use construction adhesive in addition to mechanical fasteners.
Step 3: Install Moisture Barrier
Lay down a rubber membrane or plastic sheeting over the concrete to prevent moisture wicking into the wood sleepers. This step is often overlooked but significantly extends the life of your deck system.
Step 4: Attach Sleepers
Position your sleeper boards and secure them using concrete screws (Tapcon-style) or powder-actuated fasteners. Space fasteners every 16-24 inches along each sleeper. Use shims to level any low spots, ensuring all sleepers are in the same plane.
Step 5: Install Deck Boards
Begin at the edge farthest from your home and work toward the house. Use deck screws specifically rated for your decking material, driving two fasteners at each sleeper location. Maintain consistent 1/8-inch gaps between boards for drainage and thermal expansion.
Step 6: Finishing Details
Install fascia boards around the perimeter to cover exposed sleeper ends and create a finished appearance. Apply appropriate sealer or stain to wood surfaces according to manufacturer recommendations.
Method 2: Adjustable Pedestal System
For uneven concrete or when you need to achieve a specific height, adjustable deck pedestals offer a superior solution. These plastic supports sit directly on concrete and can be adjusted from one to 24 inches high.
Step 1: Layout And Planning
Mark pedestal locations based on your joist spacing requirements. Typical spacing is 16 inches on center for standard decking or 12 inches for composite materials.
Step 2: Set Pedestals
Place pedestals at marked locations and adjust to the desired height using the built-in leveling mechanism. Use a laser level or string line to ensure all pedestals are at exactly the same height.
Step 3: Install Joist Framework
Lay your joist material (typically 2×6 or 2×8 pressure-treated lumber or composite joists) across the pedestals. The pedestals feature cradle tops that hold the joists in place without fasteners.
Step 4: Secure And Level
Some systems require securing joists to pedestals with clips or screws. Double-check levelness across the entire framework before proceeding.
Step 5: Deck Board Installation
Install your deck boards perpendicular to the joists using the same methods as a traditional raised deck. This system allows for excellent air circulation and drainage beneath the deck surface.
Method 3: Deck Tile Installation
Interlocking deck tiles offer the simplest installation for DIY homeowners with minimal tools or experience.
Step 1: Surface Preparation
Sweep and clean the concrete thoroughly. The surface must be reasonably level tiles can bridge minor irregularities but won’t work over severely uneven concrete.
Step 2: Dry Layout
Arrange tiles in your desired pattern without connecting them to visualize the final appearance and determine if any cutting is necessary at edges.
Step 3: Installation
Starting in one corner, connect tiles according to manufacturer instructions. Most systems feature interlocking tabs that snap together with hand pressure. Work across the space methodically, ensuring tight connections.
Step 4: Edge Finishing
Install edge trim pieces or cut final rows to fit using a circular saw. Some systems offer finishing strips that create clean borders.
Step 5: Securing (Optional)
While many tile systems rely solely on interlocking connections and friction, you can add construction adhesive or edge clips in high-wind areas or on sloped surfaces.
Professional Alternatives To Traditional Decking
While building a deck over concrete solves certain problems, homeowners should consider whether professional concrete solutions might better serve their needs, particularly in climates like San Antonio where outdoor surfaces endure intense stress.
Stamped And Decorative Concrete Overlays
Rather than covering your concrete with wood or composite materials that require ongoing maintenance, stamped concrete overlays provide a permanent, bonded surface that can mimic virtually any material aesthetic.
The process involves applying a thin layer of specialized concrete or polymer-modified topping to your existing slab, then using stamps and colorants to create textures and patterns resembling wood planks, natural stone, slate, brick pavers, or custom designs. Professional contractors can match existing hardscaping, coordinate with your home’s architecture, or create entirely unique patterns.
Benefits Over Traditional Decking:
Unlike wood or composite decks that create an air gap where debris, pests, and moisture can accumulate, stamped concrete creates a monolithic surface that’s easy to clean and maintain. The seamless installation eliminates gaps where weeds can grow or water can pool. Modern sealers provide UV protection and stain resistance while allowing some vapor transmission to prevent moisture issues.
Stamped concrete won’t warp, rot, fade significantly, or require annual sealing like wood decks. The surface remains cooler than composite materials in direct sunlight when treated with specialized cooling toppings. With proper installation and occasional resealing every 3-5 years, stamped concrete patios can last 20-30 years or more.
For San Antonio homeowners, working with experienced local concrete contractors who understand regional climate challenges ensures optimal results. Professionals account for the area’s soil conditions, temperature extremes, and rainfall patterns when designing and installing overlays.
Concrete Staining And Polishing
If your existing concrete is in good structural condition but lacks visual appeal, professional staining offers a transformative alternative to covering it with decking materials. Acid-based or water-based stains penetrate the concrete surface, creating rich, variegated colors that won’t peel or chip like paint.
The staining process can create everything from subtle earth tones to bold, contemporary colors. Multiple stain colors can be combined to create custom artistic patterns, geometric designs, or even faux wood-grain effects. After staining, professional polishing creates a smooth, semi-gloss finish that’s both beautiful and highly functional.
Stained and polished concrete requires minimal maintenance regular sweeping and occasional mopping with pH-neutral cleaners keeps surfaces looking pristine. The dense, sealed surface resists staining from spills, handles heavy furniture without damage, and provides decades of service.
Complete Concrete Resurfacing
For concrete slabs with significant surface damage, spalling, or aesthetic issues, professional resurfacing provides a complete renewal without the expense of demolition and replacement. This process involves applying specialized overlay materials that bond to the existing concrete, filling cracks and imperfections while creating a fresh, smooth surface.
Modern resurfacing products offer remarkable strength and flexibility, bridging existing cracks and moving with the concrete slab to prevent future cracking. After resurfacing, contractors can apply decorative finishes including stamping, staining, exposed aggregate, or spray knockdown textures.
Resurfacing costs significantly less than concrete replacement typically 50-75% less while providing a result that’s often superior to new concrete in terms of appearance and customization options. The process usually takes 2-3 days for an average patio, compared to weeks for deck construction or concrete replacement.
Cost Analysis And Budget Planning
Understanding the complete financial picture helps homeowners make informed decisions about how to build a patio deck over concrete versus exploring alternative solutions.
DIY Deck Over Concrete Cost Breakdown
Materials: Basic pressure-treated sleeper system with lumber decking costs approximately $5-8 per square foot for a 200-square-foot patio ($1,000-1,600 total). Composite materials increase this to $12-18 per square foot ($2,400-3,600 total). Deck tiles range from $8-15 per square foot ($1,600-3,000 total).
Tools and Supplies: If you don’t already own the necessary tools, budget $200-500 for a circular saw, drill, level, measuring tools, and safety equipment. Fasteners, adhesives, and sealers add another $100-200.
Time Investment: A competent DIYer can typically complete a 200-square-foot deck over concrete in 2-3 full weekends, not including planning and material acquisition time.
Total DIY Cost Range: $1,300-4,300 depending on materials chosen and tools already owned.
Professional Deck Installation Costs
Hiring professionals to install a deck over concrete costs significantly more but provides warranty protection and expert installation. According to Angi cost data, professional deck installation averages $30-60 per square foot including materials and labor.
For a 200-square-foot project, expect to pay $6,000-12,000 for professional installation with quality materials. This includes proper permits, code-compliant installation, and workmanship warranties.
Professional Concrete Solutions Costs
Stamped Concrete Overlays: Professional stamped concrete installation typically costs $8-18 per square foot depending on pattern complexity and color options. For a 200-square-foot patio, this ranges from $1,600-3,600.
Concrete Staining: Professional staining services cost $2-8 per square foot ($400-1,600 for 200 square feet) depending on color complexity and surface preparation requirements.
Complete Resurfacing: Professional concrete resurfacing ranges from $3-10 per square foot ($600-2,000 for 200 square feet) depending on condition and finish options.
Long-Term Cost Considerations
While initial costs vary significantly, long-term ownership expenses often reverse the apparent savings of budget approaches. Wood decks require annual cleaning, sealing, and staining approximately $300-600 per year in materials and labor if hiring professionals, or $100-200 for DIY maintenance.
Over a 20-year period, a pressure-treated wood deck costing $2,000 initially may require $4,000-6,000 in maintenance, plus potential board replacement, bringing total cost to $6,000-8,000 or more. Additionally, wood decks typically need complete rebuilding after 15-20 years.
Composite decks reduce maintenance costs but still require periodic cleaning and occasional board replacement where fading or staining occurs. Expect $100-300 annually in upkeep.
Professional stamped concrete, by contrast, requires only periodic resealing every 3-5 years ($200-400 per application) and basic cleaning, totaling perhaps $1,000-1,500 in maintenance over 20 years. The surface should remain functional and attractive for 25-30 years without replacement.
Maintenance And Longevity
The durability and appearance of your deck over concrete depends heavily on proper maintenance routines tailored to your material choice and local climate conditions.
Wood Deck Maintenance
Wood decking demands the most intensive maintenance schedule. Annual tasks include power washing to remove dirt and mildew, applying UV-protective stain or sealant, and inspecting for loose fasteners or damaged boards. In San Antonio’s climate, UV radiation accelerates wood degradation, making protection particularly important.
Every 2-3 years, wood decks should be stripped and refinished to maintain protection. Neglected wood decks deteriorate rapidly, developing splinters, rot, and structural weaknesses within 5-7 years.
Composite Deck Maintenance
Composite materials significantly reduce maintenance burden but aren’t completely maintenance-free. Twice-yearly cleaning with specialized composite deck cleaner prevents mold and mildew growth, particularly in shaded areas or where moisture accumulates.
Check fasteners annually and tighten any that have worked loose due to thermal expansion and contraction. Inspect for any cracked or damaged boards that should be replaced. Quality composite decking should maintain its appearance for 15-20 years with minimal intervention.
Concrete Surface Maintenance
Professional concrete surfaces require the least maintenance. Sweep regularly to remove debris that could scratch the sealer. Wash with mild soap and water as needed. Pressure washing on low settings works well for annual deep cleaning.
Reapply sealer every 3-5 years depending on traffic and exposure. Touch up any chips or cracks promptly to prevent water intrusion and progressive damage. Properly maintained stamped, stained, or resurfaced concrete should provide 25-30 years of service.
Common Mistakes To Avoid
Learning from others’ errors saves time, money, and frustration when building a patio deck over concrete.
Inadequate Drainage Planning
The most common and costly mistake is failing to maintain or improve drainage. When building over concrete, you must ensure water can flow freely beneath and around your deck structure. Trapped moisture accelerates material deterioration and can redirect water toward your home’s foundation.
Always maintain the existing concrete slope. If using a sleeper system, orient sleepers to allow water flow, and never create sealed pockets where water can accumulate. Pedestal systems naturally provide excellent drainage, but perimeter areas must allow water exit paths.
Ignoring Ventilation Requirements
Wood and composite materials need air circulation to prevent moisture accumulation and mold growth. Deck boards installed directly against concrete without spacing create perfect conditions for decay. Always use sleepers, pedestals, or tiles that create at least a one-inch air gap.
Using Wrong Fasteners
Standard wood screws rust and fail quickly in outdoor applications. Concrete fasteners must be specifically rated for outdoor use and the loads they’ll support. Always use stainless steel or heavily coated screws designed for the specific materials you’re joining.
Neglecting Thermal Expansion
Composite and PVC materials expand and contract significantly with temperature changes far more than wood. San Antonio’s temperature swings from freezing to over 100°F demand proper expansion gaps. Follow manufacturer specifications exactly, typically requiring 1/4-inch gaps at all fixed points.
Skipping Permits
Building without required permits creates multiple problems. Unpermitted work may violate insurance policies, complicate future home sales, and leave you liable if the structure fails or causes damage. Permits are inexpensive insurance that your project meets safety standards.
Poor Material Selection For Climate
Choosing materials without considering San Antonio’s climate leads to disappointment. Some composites become uncomfortably hot in direct sunlight. Unsealed wood weathers rapidly under intense UV exposure. Research how materials perform specifically in South Texas conditions before purchasing.
When To Call A Professional
While building a deck over concrete is within the capabilities of skilled DIYers, certain situations warrant professional expertise.
Complex Site Conditions
If your concrete has significant drainage issues, major settling, extensive cracking, or height challenges that make code compliance difficult, professional evaluation is essential. Experienced contractors can determine whether building over the slab is appropriate or if alternative solutions better serve your needs.
Limited Time Or Tools
Deck building requires specialized tools, physical labor, and sustained time commitment. If you lack the tools, skills, or available weekends to complete the project properly, professional installation may actually cost less than accumulated tool purchases, material waste from errors, and project delays.
Desire For Concrete Solutions
Homeowners interested in stamped concrete, decorative overlays, or professional resurfacing should always hire qualified concrete contractors. These techniques require specialized equipment, materials, and expertise that DIY application cannot replicate. Poor installation of concrete overlays leads to delamination, cracking, and costly repairs.
For San Antonio homeowners exploring professional concrete alternatives, working with established local contractors ensures access to proven techniques for regional conditions. Companies specializing in decorative concrete, pool deck construction, and patio resurfacing bring years of experience addressing the unique challenges of South Texas climate and soil conditions.
Warranty And Insurance Protection
Professional installation provides warranty protection on both materials and workmanship. If problems develop, you have recourse for repairs or replacement. DIY projects offer no such protection errors become expensive lessons.
Licensed, insured contractors also protect you from liability if injuries occur during construction or if the completed structure fails and causes property damage.
Transform Your Concrete Patio With Professional Solutions
Building a patio deck over concrete solves certain aesthetic and functional challenges, but for San Antonio homeowners seeking the most durable, low-maintenance, and visually impressive outdoor spaces, professional concrete solutions often provide superior value.
Rather than covering your concrete with materials that require ongoing upkeep and eventual replacement, consider transforming the surface itself through stamped concrete overlays, decorative staining, or complete resurfacing. These approaches create beautiful, permanent outdoor living areas that withstand South Texas heat, intense UV exposure, and occasional hard freezes better than any decking material.
Affordable Concrete San Antonio specializes in transforming tired, damaged, or uninspiring concrete patios into stunning outdoor retreats. With over a decade of experience and 8,000+ completed projects, our team brings unmatched expertise in:
- Stamped Concrete Patios that mimic natural stone, wood, or brick at a fraction of the cost
- Decorative Concrete Staining that adds rich, permanent color and character
- Professional Resurfacing that repairs damage and creates like-new surfaces
- Custom Patio Design incorporating fire pits, seating walls, and integrated hardscaping
- Pool Deck Construction with specialized cooling toppings and slip-resistant finishes
Our comprehensive approach includes free on-site consultations where we assess your existing concrete, discuss your vision and budget, and provide honest recommendations about whether building over your slab or transforming it makes the most sense for your specific situation.
Why San Antonio Homeowners Choose Professional Concrete Solutions
Durability: Properly installed stamped concrete and overlays last 25-30 years with minimal maintenance far exceeding the lifespan of wood or composite decks.
Low Maintenance: Annual sealing is eliminated or reduced to once every 3-5 years. No more painting, staining, or board replacement.
Climate Appropriate: Concrete thrives in San Antonio’s climate. It won’t rot from humidity, warp from temperature swings, or fade from UV exposure the way decking materials do.
Property Value: High-quality decorative concrete typically adds more resale value than decking, and buyers appreciate the low maintenance requirements.
Customization: Virtually unlimited design options allow perfect coordination with your home’s architecture and existing landscape.
Safety: Properly textured and sealed concrete provides excellent traction when wet crucial for pool decks and high-traffic areas.
Our Process
- Free Consultation: We visit your property, assess your concrete, discuss options, and provide a detailed, transparent quote with no hidden fees.
- Professional Preparation: Our crew handles all site preparation, repairs any damaged concrete, and ensures proper drainage and substrate preparation.
- Expert Installation: Using premium materials and proven techniques, we create your custom concrete surface with meticulous attention to detail.
- Final Walkthrough: We don’t consider the job complete until you’re 100% satisfied. We walk through the finished project together and address any concerns.
Ready To Explore Your Options?
Whether you ultimately decide to build a deck over your concrete or transform the surface itself, making an informed decision starts with understanding all available options and their long-term implications.
Contact Affordable Concrete San Antonio today for your free, no-obligation consultation. Let us show you what’s possible for your outdoor space.
Phone: 713-504-234, Email: info@affordableconcretesanantonio.com, Address: 1247 W Thompson Pl, San Antonio, TX 78226
We proudly serve San Antonio and all surrounding communities with the same dedication to quality, transparency, and customer satisfaction that has earned us over 1,000 five-star reviews.
Transform your outdoor space into something extraordinary. Let’s build something beautiful together.