
A stamped concrete patio is a decorative outdoor surface made by pouring concrete and pressing patterns into it before it fully hardens. The result can resemble stone, brick, slate, tile, or wood at a lower cost and with greater design flexibility.
This guide explains how to do a stamped concrete patio from start to finish. It is written for beginners and intermediate learners who want a clear, realistic understanding of the process, tools, materials, and common challenges involved.
This is not a quick DIY project. Stamped concrete requires careful timing, preparation, and teamwork. Understanding the full process before starting is essential.
What Is A Stamped Concrete Patio?
Stamped concrete is standard poured concrete that is textured and colored to mimic other materials.
The decorative effect comes from:
- Texture mats or stamps pressed into fresh concrete
- Color hardeners or integral pigments
- Antique release agents that add depth and contrast
Unlike pavers or stone, stamped concrete is a single continuous slab, which affects how it drains, cracks, and ages.
Why Stamped Concrete Patios Matter
Stamped concrete patios are popular because they balance durability, design flexibility, and cost.
From a practical standpoint, they offer:
- Fewer joints than pavers
- Custom patterns and colors
- Easier maintenance compared to stone
- Long-term durability when installed correctly
From a user perspective, mistakes are expensive to fix. Poor prep or timing errors often mean full removal and replacement. That is why understanding how to do a stamped concrete patio correctly is more important than the pattern choice itself.
Is A Stamped Concrete Patio A DIY Project?
Stamped concrete sits between DIY-friendly and professional-only work.
It may be suitable if:
- You have concrete experience
- You can work with a team of 3–4 people
- You can pour, finish, and stamp within tight time windows
It is not recommended if:
- You are working alone
- You have never poured concrete before
- The patio is large or structurally critical
Many homeowners choose to do prep work themselves and hire professionals for the pour and stamping.
Tools And Materials Required
Essential Tools
- Concrete mixer or ready-mix delivery
- Wheelbarrows and shovels
- Screed board
- Bull float and hand trowels
- Edger and groover
- Texture stamping mats
- Tamper
- Pressure washer (for curing cleanup)
Materials
- Concrete mix (3,000–4,000 PSI)
- Crushed stone or gravel base
- Wooden or metal forms
- Rebar or wire mesh
- Integral color or color hardener
- Release agent
- Concrete sealer
1. Planning And Layout
Before any concrete is mixed, the patio must be carefully planned.
Key Planning Decisions
- Patio size and shape
- Drainage slope (minimum 1/8 inch per foot)
- Pattern layout and stamp orientation
- Control joint placement
- Color system (integral vs surface-applied)
Mistakes at this stage are permanent once concrete is poured.
2. Ground Preparation And Base Installation
Base preparation determines how long the patio will last.
Proper Base Preparation Includes:
- Excavating 6–8 inches below final grade
- Compacting soil thoroughly
- Adding 4–6 inches of crushed stone
- Compacting the gravel in layers
A weak base leads to cracking and sinking, regardless of surface quality.
3. Building And Setting Forms
Forms shape the patio and control slab thickness.
Best Practices
- Use straight, rigid form boards
- Secure with stakes every 2–3 feet
- Ensure consistent slab thickness (minimum 4 inches)
- Double-check slope and square corners
Forms must not move during the pour.
4. Reinforcement Installation
Reinforcement improves structural integrity.
Common options include:
- Welded wire mesh
- Rebar grid
- Fiber reinforcement mixed into concrete
Reinforcement does not prevent cracks but helps control their movement.
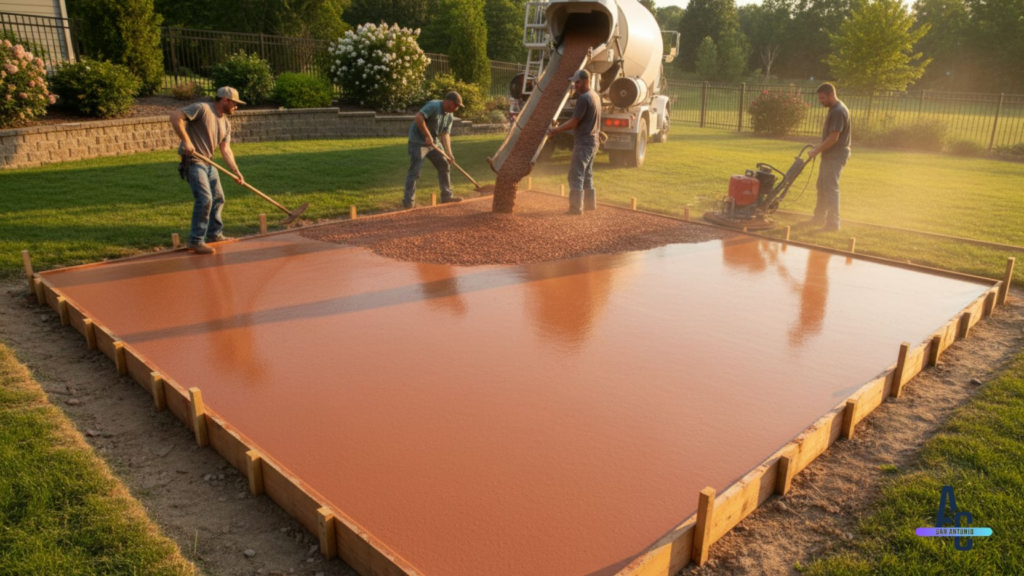
5. Pouring The Concrete
Timing becomes critical at this stage.
Pouring Guidelines
- Pour continuously to avoid cold joints
- Spread evenly within forms
- Screed immediately to level
- Bull float to embed aggregate and smooth the surface
Avoid overworking the concrete. Excessive finishing brings water to the surface and weakens the slab.
6. Applying Color
There are two main coloring methods.
Integral Color
- Mixed into concrete before pouring
- Produces uniform color throughout the slab
- Less variation and depth
Color Hardener
- Broadcast onto the surface after screeding
- Adds strength and richer color
- Requires skill to apply evenly
Many stamped concrete patios use both methods together.
7. Applying Release Agent
Release agent prevents stamps from sticking and adds accent color.
Types include:
- Powder release
- Liquid release
Apply evenly before stamping. Uneven application causes blotches and weak texture definition.
8. Stamping The Concrete
This is the most time-sensitive step in how to do a stamped concrete patio.
Stamping Process
- Wait until concrete supports weight without sinking
- Start stamping at a consistent edge
- Overlap mats according to pattern
- Tamp stamps evenly
- Maintain alignment throughout
Concrete that is too wet loses texture. Concrete that is too hard will not accept the pattern.
9. Cutting Control Joints
Control joints manage cracking.
Joint Guidelines
- Cut within 12–24 hours
- Depth should be 25% of slab thickness
- Place joints along natural pattern lines when possible
Ignoring joint placement leads to random cracking.
10. Curing And Cleaning
Proper curing strengthens concrete.
Curing Best Practices
- Keep surface moist for several days
- Avoid heavy traffic for at least 7 days
- Pressure wash excess release after curing
Do not rush this phase.
11. Sealing The Stamped Concrete Patio
Sealing protects color and surface texture.
Sealer Options
- Acrylic (most common)
- Penetrating sealers
- Solvent-based or water-based
Apply sealer only after full curing, usually 28 days.
Re-sealing is typically needed every 2–3 years.
Common Mistakes To Avoid
- Poor base compaction
- Incorrect concrete mix
- Over-finishing the surface
- Stamping too early or too late
- Skipping control joints
- Sealing too soon
Most failures trace back to rushed timing or inadequate preparation.
Maintenance Expectations
Stamped concrete patios require regular care.
Ongoing Maintenance Includes:
- Gentle cleaning
- Re-sealing on schedule
- Avoiding de-icing salts
- Repairing small cracks early
With proper care, stamped concrete can last 25+ years.
Use Cases
Stamped concrete patios are commonly used for:
- Residential backyards
- Pool decks
- Walkways and courtyards
- Outdoor dining areas
- Commercial plazas
Each use case may require different slip resistance, thickness, and sealing strategies.
Final Thoughts
Learning how to do a stamped concrete patio requires understanding both concrete fundamentals and decorative finishing techniques. The process rewards preparation, timing, and teamwork more than creativity alone.
For small patios with experienced help, DIY is possible. For larger or complex designs, professional installation often reduces long-term risk.
Treat stamped concrete as a construction project first and a design project second.