How to Reseal Concrete Patio: A Complete Guide for San Antonio Homeowners
Your concrete patio endures relentless Texas sun, heavy rainfall, and temperature swings that can crack and fade even the most durable surfaces. Without proper sealing, that beautiful outdoor space you invested in can deteriorate within just a few years leaving you with expensive repairs or complete replacement.
Resealing your concrete patio isn’t just maintenance; it’s protection. A quality sealer acts as a shield against moisture penetration, UV damage, staining, and surface wear. For San Antonio homeowners, where summer temperatures regularly exceed 95°F and sudden storms can dump inches of rain, resealing becomes essential to preserving your patio’s longevity and appearance.
This comprehensive guide walks you through everything you need to know about how to reseal concrete patio surfaces from identifying when it’s time to reseal, selecting the right products, and executing the process like a professional. Whether you’re maintaining a standard brushed finish or protecting decorative stamped concrete, this article delivers actionable insights backed by industry expertise and real-world experience.
Why Resealing Your Concrete Patio Matters
Concrete appears solid and impervious, but it’s actually porous. Without a protective barrier, water seeps into microscopic pores, carrying dirt, oils, and chemicals. During San Antonio’s occasional freezes, trapped moisture expands, creating internal pressure that leads to surface spalling and cracks.
According to experts at The Concrete Network, unsealed concrete absorbs up to 10% of its weight in water. This absorption accelerates weathering, discoloration, and structural degradation.
Key benefits of resealing include:
- Moisture protection: Prevents water infiltration that causes freeze-thaw damage and mold growth
- UV resistance: Blocks harmful rays that fade colored and stamped concrete
- Stain prevention: Creates a barrier against oil, grease, wine, and food spills
- Enhanced appearance: Restores color vibrancy and can add a subtle sheen
- Extended lifespan: Properly sealed patios last 2-3 times longer than unsealed surfaces
- Easier cleaning: Sealed surfaces resist dirt accumulation and clean with simple soap and water
For decorative concrete patios including stamped, stained, or exposed aggregate finishes sealing is even more critical. These surfaces require protection to maintain their aesthetic appeal and prevent the degradation of surface treatments.
Signs Your Patio Needs Resealing
Knowing when to reseal prevents costly damage. Watch for these telltale indicators:
The Water Bead Test
The simplest test: pour a glass of water on your patio surface. If it beads up and doesn’t absorb, your sealer is still effective. If the concrete darkens as water soaks in within seconds, resealing is overdue.
Visual and Tactile Signs
- Color fading: Original color appears washed out or uneven
- Surface chalking: White powdery residue appears when you rub the surface
- Loss of sheen: Previously glossy surfaces look dull and flat
- Visible wear patterns: High-traffic areas show more deterioration
- Staining: Oil, rust, or organic stains penetrate the surface
- Cracking or pitting: Small surface cracks or pockmarks appear
- Efflorescence: White crystalline deposits emerge from the concrete
Most concrete sealers require reapplication every 2-4 years, depending on exposure, traffic, and sealer type. High-traffic areas and surfaces exposed to direct sunlight deteriorate faster.
Types Of Concrete Sealers Explained
Choosing the right sealer determines both protection level and aesthetic outcome. The two primary categories are penetrating sealers and topical sealers.
Penetrating Sealers (Silanes and Siloxanes)
These sealers soak into the concrete, forming a chemical barrier below the surface. They don’t change the appearance and allow the concrete to breathe.
Pros:
- Excellent moisture protection
- Won’t peel or yellow
- Long-lasting (5-10 years)
- Maintains natural look
- Ideal for outdoor patios
Cons:
- Minimal stain resistance
- No gloss enhancement
- Higher cost per application
Best for: Standard concrete patios, broom-finished surfaces, and homeowners wanting invisible protection.
Topical Sealers (Acrylics and Urethanes)
These form a protective film on the concrete surface, offering excellent stain resistance and aesthetic enhancement.
Acrylic Sealers:
- Affordable and easy to apply
- Available in matte, satin, or high-gloss finishes
- Good UV resistance
- Requires reapplication every 2-3 years
- Water-based or solvent-based options
Urethane Sealers:
- Superior durability and abrasion resistance
- Excellent chemical and stain protection
- Longer lifespan (5-7 years)
- Higher cost
- More difficult to apply
Best for: Decorative concrete, stamped patios, stained surfaces, and homeowners wanting enhanced appearance.
Epoxy Sealers
Epoxy provides the toughest protection but is primarily used for garage floors and high-traffic commercial spaces. It’s typically overkill for residential patios and can create a slippery surface when wet.
According to HomeAdvisor’s concrete sealing guide, acrylic sealers are the most popular choice for residential patios due to their balance of protection, appearance, and affordability.
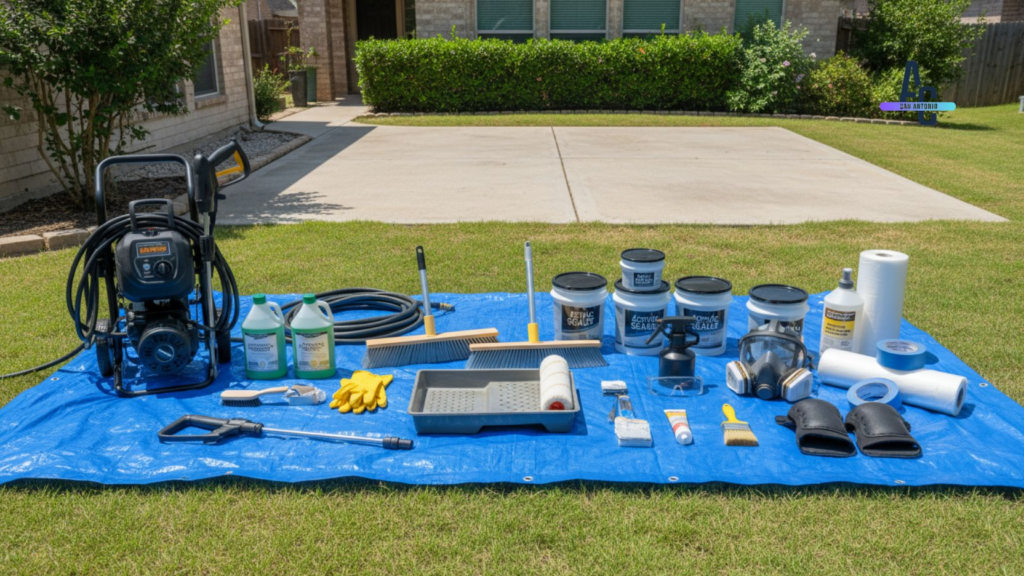
Tools And Materials You’ll Need
Proper preparation prevents poor performance. Gather these supplies before starting:
Cleaning Supplies:
- Pressure washer (2000-3000 PSI recommended)
- Concrete degreaser or cleaner
- Stiff-bristled brush
- Garden hose
- Scrub brush for spot cleaning
Sealer Application Tools:
- Concrete sealer (appropriate type and quantity)
- Paint roller with extension pole (3/4″ nap for textured surfaces)
- Paint tray
- High-quality synthetic paintbrush (for edges and corners)
- Pump sprayer (optional, for large areas)
Safety Equipment:
- Safety glasses
- Chemical-resistant gloves
- Respirator mask (for solvent-based sealers)
- Knee pads
Additional Materials:
- Plastic sheeting or tarps
- Painter’s tape
- Crack filler (if needed)
- Etching solution (for slick surfaces)
Coverage calculation: Most sealers cover 200-400 square feet per gallon, but porous or textured surfaces require more. Always purchase 10-15% extra to account for application losses.
Step-By-Step: How To Reseal Concrete Patio
Follow this professional process for optimal results:
Step 1: Choose The Right Weather Conditions
Timing is everything. Ideal conditions include:
- Temperature: 50-85°F
- Humidity: Below 50%
- No rain in forecast for 24-48 hours
- Avoid direct, intense sunlight (can cause rapid drying)
- Morning application often works best in San Antonio
Step 2: Clear And Protect The Area
Remove all furniture, planters, grills, and decorations. Cover adjacent surfaces, walls, landscaping, windows with plastic sheeting and painter’s tape. Seal off the area to prevent foot traffic during application and curing.
Step 3: Deep Clean The Surface
This is the most critical step. Any dirt, oil, or residue will prevent proper sealer adhesion.
- Sweep thoroughly to remove loose debris
- Apply concrete cleaner according to manufacturer instructions
- Scrub stubborn stains with a stiff brush and degreaser
- Pressure wash the entire surface, working in overlapping passes
- Remove standing water with a squeegee or leaf blower
- Allow to dry completely (24-48 hours minimum)
Test moisture levels by taping a 2×2-foot piece of plastic to the surface. If condensation appears underneath after 24 hours, the concrete is still too wet.
Step 4: Repair Damage
Inspect for cracks, chips, or spalling. Fill cracks with concrete crack filler or patching compound. For significant damage, consider professional concrete patio repairs before sealing. Allow all repairs to cure according to product specifications.
Step 5: Etch Smooth Surfaces (If Needed)
Extremely smooth or power-troweled concrete may need etching to improve sealer penetration. Apply an etching solution following manufacturer guidelines, then rinse thoroughly and allow to dry.
Step 6: Apply The First Coat
For roller application:
- Pour sealer into paint tray
- Start at the farthest corner from your exit
- Apply in thin, even coats using overlapping W-patterns
- Work in 4×4-foot sections
- Brush edges and corners by hand
- Avoid puddles or thick applications
For sprayer application:
- Fill pump sprayer with sealer
- Apply in consistent, overlapping passes
- Back-roll immediately for even distribution
- Maintain wet edge to prevent lap marks
Most surfaces require 100-200 square feet of coverage per gallon on the first coat.
Step 7: Allow Proper Dry Time
Follow manufacturer drying specifications exactly. Typical wait times between coats:
- Water-based acrylics: 2-4 hours
- Solvent-based acrylics: 4-6 hours
- Urethanes: 6-8 hours
Temperature and humidity affect drying time significantly.
Step 8: Apply The Second Coat
Most concrete patio sealers require two coats for optimal protection. Apply the second coat using the same technique as the first, working perpendicular to your original direction for better coverage.
Step 9: Cure And Protect
After the final coat:
- Keep surface dry for 24-48 hours minimum
- Prevent foot traffic for 24 hours
- Wait 72 hours before placing furniture
- Avoid vehicle traffic for 7 days (if applicable)
According to data from Angi’s concrete sealing resource, proper curing dramatically extends sealer lifespan and effectiveness.
Common Mistakes To Avoid
Even experienced DIYers make these errors:
Applying Sealer To Wet Concrete
Moisture trapped under sealer causes cloudiness, poor adhesion, and premature failure. The concrete must be completely dry typically 24-48 hours after cleaning, longer in humid conditions.
Using The Wrong Sealer Type
Penetrating sealers won’t enhance appearance. Topical sealers can yellow on interior surfaces. Match the sealer to your specific patio type and desired outcome.
Over-Application
More isn’t better. Thick coats lead to bubbling, peeling, and uneven appearance. Two thin coats always outperform one thick coat.
Skipping Surface Preparation
The number one cause of sealer failure is inadequate cleaning. Oil, efflorescence, old sealer residue, and dirt prevent proper bonding.
Ignoring Temperature Guidelines
Applying sealer in extreme heat causes rapid evaporation and poor penetration. Cold temperatures prevent proper curing. Always follow manufacturer temperature specifications.
Not Testing First
Always test your chosen sealer on a small, inconspicuous area first. This reveals how it affects color, sheen, and compatibility with your specific concrete.
How Often Should You Reseal?
Resealing frequency depends on multiple factors:
Sealer Type:
- Acrylic sealers: Every 2-3 years
- Penetrating sealers: Every 5-10 years
- Urethane sealers: Every 5-7 years
Environmental Exposure:
- High sun exposure: More frequent resealing needed
- Covered/shaded areas: Less frequent maintenance
- High rainfall areas: More frequent applications
Traffic Level:
- Heavy foot traffic: Every 2-3 years
- Moderate use: Every 3-4 years
- Light traffic: Every 4-5 years
Surface Type:
- Decorative/stamped concrete: Every 2-3 years (appearance maintenance)
- Standard brushed finish: Every 3-5 years
- Stained concrete: Every 2-3 years
For San Antonio’s climate, characterized by intense UV exposure, occasional freezes, and dramatic temperature swings, plans to reseal decorative surfaces every 2-3 years and standard concrete every 3-4 years.
Professional VS. DIY Resealing
When DIY Makes Sense
Resealing is a manageable DIY project if:
- Your patio is under 500 square feet
- The surface is in good condition with minimal damage
- You have the time and appropriate weather window
- You’re comfortable with physical labor and attention to detail
Average DIY costs:
- Sealer: $30-60 per gallon
- Cleaning supplies: $20-50
- Equipment rental: $50-100
- Total for 300 sq ft patio: $150-300
When To Call Professionals
Consider professional concrete patio resurfacing services when:
- Surface has significant cracking or damage requiring repair
- Patio exceeds 500 square feet
- Previous sealer is failing and needs stripping
- You want decorative enhancements (staining, scoring, stamping)
- Time constraints prevent proper application and curing
- Working with specialty sealers requiring professional equipment
Professional service benefits:
- Proper surface preparation and damage repair
- Industrial-grade equipment and materials
- Warranty on workmanship
- Faster completion
- Expertise in complex decorative finishes
At Affordable Concrete San Antonio, our concrete patio installation and maintenance services include professional resealing using commercial-grade products designed specifically for Texas climate conditions. With over 14 years of experience and 8,000+ completed projects, we ensure your patio receives the protection it deserves.
FAQs
How Long Does Concrete Sealer Last?
Sealer lifespan varies by type: acrylic sealers last 2-3 years, penetrating sealers 5-10 years, and urethanes 5-7 years. Environmental factors and traffic significantly impact longevity.
Can I Reseal Over Old Sealer?
Yes, if the old sealer is still adhering well. Clean thoroughly and apply a compatible sealer. If the old sealer is peeling or failing, strip it completely before reapplying.
What Happens If I Don’t Reseal My Patio?
Unsealed concrete absorbs water, leading to staining, cracking, spalling, and premature deterioration. In freeze-thaw climates, damage accelerates significantly.
Will Sealer Make My Patio Slippery?
High-gloss sealers can create slippery surfaces when wet. Choose matte or satin finishes, or add non-slip additives to glossy sealers for safety.
Can I Apply Sealer In Direct Sunlight?
Not recommended. Direct sun causes rapid evaporation, preventing proper penetration and creating an uneven finish. Apply during cooler morning or evening hours.
How Do I Remove Old Concrete Sealer?
Use a chemical sealer stripper or mechanical grinding. Chemical strippers are effective for acrylic and urethane sealers. Consult professionals for difficult removals.
Protect Your Investment With Expert Resealing
Learning how to reseal concrete patio surfaces properly protects your investment and extends the life of your outdoor living space. Whether you choose DIY maintenance or professional service, regular resealing prevents costly damage and keeps your patio looking beautiful year after year.
For San Antonio homeowners seeking expert guidance or professional resealing services, Affordable Concrete San Antonio delivers superior results backed by 14 years of experience. We specialize in all aspects of concrete patio construction, resurfacing, and maintenance from standard brushed finishes to elaborate stamped and decorative designs.
Ready to Restore Your Patio?
Don’t wait until damage becomes expensive. Our team provides:
- Professional concrete patio resurfacing that renews worn surfaces
- Expert resealing services using commercial-grade products
- Complete patio repairs addressing cracks, chips, and drainage issues
- Custom concrete patio designs tailored to your vision
- Free estimates with transparent pricing
Contact Affordable Concrete San Antonio today: San Antonio: 1247 W Thompson Pl, San Antonio, TX 78226, Houston: 6203 Lawford Ln, Houston, TX 77040, Call: 713-504-2341 Email: info@affordableconcretesanantonio.com
Transform your outdoor space with San Antonio’s most trusted concrete experts. With 8,000+ completed projects and 1,000+ five-star reviews, we deliver the quality and service your home deserves.