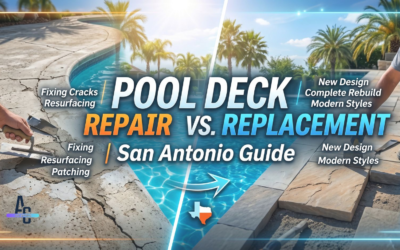
Most pool deck failures in San Antonio start at the expansion joints, or rather, at the places where expansion joints were missing, undersized, or filled with the wrong material. This guide covers every decision: joint types, correct spacing, sealant selection, and how to know when repair is no longer enough.
A pool deck that cracks, heaves, or separates from the pool coping almost never fails because the concrete was bad. It fails because the expansion joints were skipped, spaced too far apart, filled with rigid material, or simply never maintained after installation. In San Antonio's climate, that mistake is especially costly.
Concrete expands and contracts with temperature changes. In San Antonio, the swing between a January night and a July afternoon can exceed 90 degrees Fahrenheit. A pool deck slab with no room to move will find its own relief, and that relief looks like a crack running straight through the middle of your finish. Expansion joints are the engineered solution. They give the concrete a controlled place to move so it does not crack where you do not want it to.
Concrete is not a rigid, permanent material. It moves with every temperature change, every rain event, every shift in the clay soils underneath it. The homeowners who avoid pool deck failures are not the ones who pour the thickest slabs or use the most expensive finishes. They are the ones who build movement into the design from the start: correct joint spacing, the right sealant material, and a maintenance schedule that treats expansion joints as a consumable, not a permanent installation. Joints cost a few dollars per linear foot to maintain. A cracked and lifted pool deck costs thousands to replace.
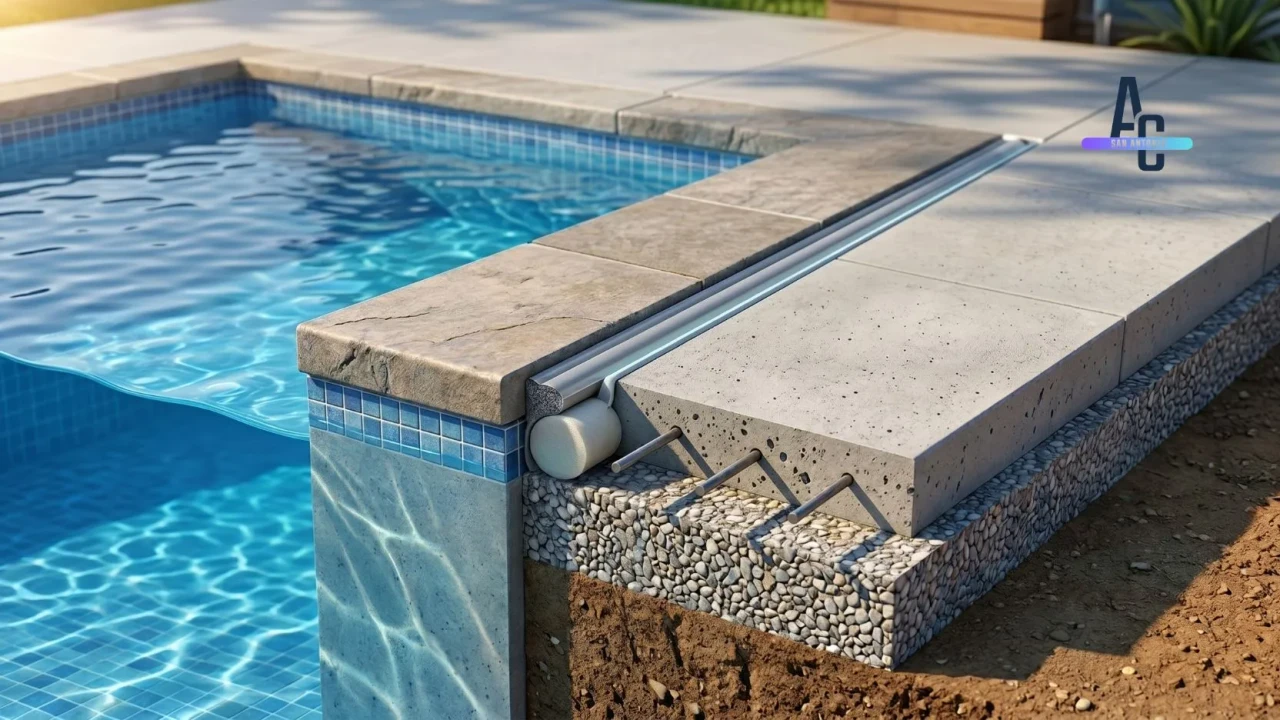
An expansion joint is a deliberate gap built into a concrete slab, filled with a compressible material, that allows the slab to expand and contract without cracking. The gap absorbs the dimensional changes that happen every time the temperature rises or falls. Without that gap, the slab has nowhere to go, and it cracks under the stress of its own movement.
Pool decks need expansion joints more urgently than almost any other concrete surface for three reasons that combine in San Antonio's environment. First, pool decks are exposed to full sun with no shade relief, so surface temperatures spike far above air temperature on summer days. Second, the deck sits directly adjacent to a large body of water, so it cycles through wet and dry conditions daily. Third, the deck is anchored on one side to the pool shell, which is a fixed structure, creating a hard constraint against movement.
The isolation joint at the pool coping is the most critical joint on the entire deck. The pool shell and the deck slab move independently: the shell is anchored in the ground, while the deck slab sits on top of soil that compresses, expands, and shifts. If the deck is bonded directly to the coping with no isolation joint, one of two things happens. Either the deck lifts the coping, or the coping restrains the deck and causes it to crack. Neither outcome is cheap to fix.
- Isolation joint confirmed between pool deck slab and pool shell coping at the full perimeter
- Contraction joints cut or tooled within 24 hours of pour to control shrinkage cracking
- All joints filled with compressible, flexible material, never rigid grout or mortar
- Joint width appropriate for expected temperature range: minimum 3/4" for pool decks in South Texas
- Backer rod installed before sealant to control sealant depth and ensure correct tooling profile
San Antonio's climate stresses pool deck expansion joints through four overlapping forces that most other U.S. cities face one or two of, not all four at once. Understanding each force helps you see why standard joint specs from other regions often underperform here.
The most vulnerable season for San Antonio pool deck joints is not summer, it is fall: After a summer of maximum expansion compressing the joints tightly, the first significant temperature drop in October causes rapid contraction. If the sealant has hardened, lost adhesion, or been extruded out of the joint by summer compression, it cannot extend with the concrete as it contracts. That is when you see joints open up, old sealant pop loose, or cracks appear at joint edges. Inspect and reseal joints every fall before temperatures drop, not in spring after the damage has already occurred.
- Sealant specified as UV-stable, self-leveling polyurethane or polyurea rated for South Texas temperature range
- Base prep confirmed: 4 to 6 inches of compacted crushed limestone to reduce clay soil movement transfer
- Joint inspection scheduled annually in September or October before first cool weather
- No rigid material (mortar, grout, or non-flexible caulk) in any pool deck joint
- Drainage slope confirmed: 1/8 inch per foot away from pool and away from slab edges to reduce water infiltration at joints
Getting the joint specification right is the difference between a pool deck that holds up for 20 years and one that needs a full reseal job every 18 months. There are three variables to get right: joint width and depth, backer rod selection, and sealant material.
For pool decks in San Antonio, expansion joints should be a minimum of 3/4 inch wide and spaced no more than 6 to 8 feet apart in both directions. This is tighter than the 10 to 12 foot spacing used in some other regions because of the temperature extremes and soil movement described in the previous section. The isolation joint at the pool coping should be a minimum of 3/4 inch wide and run the full perimeter of the pool.
Backer rod is a closed-cell foam rope inserted into the joint before the sealant is applied. It does two things: it controls the sealant depth (preventing a too-deep sealant bead that fails in tension), and it provides a bond-breaker at the bottom of the joint so the sealant bonds to two faces only, not three. A sealant bonded to three faces cannot stretch without tearing. Most joint failures that look like sealant quality problems are actually backer rod omission problems.
The shape factor rule is non-negotiable: Joint sealant must be twice as wide as it is deep. A 3/4 inch wide joint needs 3/8 inch of sealant depth, no more. If you pour sealant all the way to the bottom of a 1.5 inch deep joint, the sealant cannot elongate properly when the concrete contracts. The sealant stretches at the bond faces and tears. Backer rod installed at the correct depth is the only reliable way to achieve and maintain this ratio.
- Joint width: 3/4 inch minimum for pool deck field joints; 3/4 to 1 inch at coping isolation joint
- Backer rod specified and installed: closed-cell foam, 25% wider than the joint opening
- Sealant specified as polyurethane or polyurea, not silicone or acrylic
- Shape factor confirmed: sealant depth is half the joint width
- Joint spacing: 6 to 8 feet on center in both directions across the deck field
- Full perimeter isolation joint confirmed between deck slab and pool coping
Pool deck joint problems give clear visual signals before they become structural problems. Catching them early is the difference between a reseal job and a full deck replacement. Here is how to read the symptoms and what each one means for your next step.
| What you see | What it means | Urgency and next step |
|---|---|---|
| Sealant cracked on surface only | UV degradation of sealant top layer. Underlying adhesion may still be intact. | Low urgency. Reseal within the next maintenance cycle. Monitor for debonding. |
| Sealant pulled away from one wall of the joint | Adhesion failure. Water can now travel behind the sealant. This is a joint failure even if it looks minor. | High urgency. Remove sealant completely, clean joint, apply primer, and reseal within the season. |
| Sealant missing entirely from a section | Sealant was extruded out by summer compression, was never installed, or was never properly bonded and fell out. | Immediate. Open joint allows direct water infiltration to subbase. Clean, install backer rod, and reseal. |
| Deck slab raised or tilted adjacent to pool | Isolation joint at coping has failed. Deck movement is being transferred to the coping structure, or clay soil heave is lifting the slab. | Requires professional assessment. Possible mudjacking or slab lifting before resealing. Do not reseal over a lifted slab without addressing the cause. |
| Cracks running between joints (mid-slab) | Joints are spaced too far apart, or joints were never cut, so the slab cracked at its weakest point instead of the joint. | Crack fill as a temporary measure. Long-term fix requires cutting additional joints near the crack line and resealing the full joint network. |
| Coping separating from pool shell | The isolation joint between deck and coping was bonded with mortar or grout. Deck movement forced the coping off the beam. | Requires professional repair. Remove mortar, reset coping, install proper isolation joint before reattaching. |
| Water staining or efflorescence at joint edges | Water is penetrating the joint and traveling through the slab. Mineral deposits from the subbase are being carried to the surface. | Moderate urgency. Confirm drainage slope, clean joint fully, reseal. May indicate base saturation from poor slope design. |
Joint repair is the right answer when the slab itself is structurally sound and the problems are limited to the joint fill. Once the slab is cracked, significantly lifted, or the base has been compromised by years of water infiltration through failed joints, resealing joints is a cosmetic fix on a structural problem. The honest answer at that point is partial or full deck replacement, done correctly this time with proper joint spacing and the right sealant materials.
- Walk the full perimeter of the pool and inspect every linear foot of the coping isolation joint
- Test all slab sections adjacent to the pool for flex or hollow sound by pressing at the edges
- Check all field joints for sealant adhesion on both walls, not just surface appearance
- Measure joint width with a tape or gauge: joints narrower than 1/2 inch may be overfilled or may have closed up from soil heave
- Check drainage slope: pool deck should drain away from the pool at 1/8 inch per foot minimum
- Document any mid-slab cracks: mark location, width, and whether displacement exists between the two sides
Pool deck joint work is a small but highly specific trade skill. A general concrete contractor who does driveways and patios all day may not have current knowledge of the right sealant materials, correct backer rod installation, or proper joint preparation for a pool deck environment. These questions will quickly tell you whether the contractor in front of you knows the work or is guessing.
| Question to ask | A knowledgeable answer sounds like | A red flag answer sounds like |
|---|---|---|
| What sealant do you use for pool deck joints in San Antonio? | Self-leveling polyurethane or two-part polyurea, UV-stable grade, with a primer on porous concrete. | "Caulk" or "silicone" or "whatever sticks best." No mention of elongation or UV rating. |
| Do you use backer rod? | Yes, always. Closed-cell foam, sized to 25% wider than the joint, installed before sealant to control depth and provide a bond-breaker at the base. | "What's backer rod?" or "We just fill it up." |
| How do you prep the joint before sealing? | Saw-cut or rout any irregular edges, blow out debris with compressed air, clean with a wire brush, apply primer if the concrete is porous or previously sealed. | "We just clean it out and fill it." No mention of primer or surface preparation. |
| What spacing do you recommend for the coping isolation joint on a San Antonio pool deck? | 3/4 to 1 inch wide, full perimeter, nothing rigid in the joint. The deck and the pool shell need to move independently. | "We'll just match what's there" or confusion about what an isolation joint is. |
| How long will the sealant last in San Antonio conditions? | Two to three years on a polyurethane with proper prep and a UV-stable product. Three to five years with a quality polyurea. Annual inspection is recommended regardless. | "It'll last a long time" with no specific number or product reference. |
| Are you licensed and insured in Texas? | Certificate of insurance provided on request, general liability minimum $1M, workers' comp confirmed if they have employees. | "We're covered" with no documentation. Any resistance to providing a certificate. |
Ask for references specifically from pool deck joint work, not just general concrete projects: A contractor who has done 50 driveways and 10 patios but zero pool deck joint repairs is a learning experience at your expense. Pool decks have specific constraints around chemical exposure (pool chemicals affect some sealants), drainage requirements, and the isolation joint at the coping that driveways simply do not have. One or two references from pool deck jobs in Bexar County, with a phone number you can actually call, tells you more than any sales presentation.
- Sealant product named specifically: polyurethane or polyurea with UV-stable rating confirmed
- Backer rod confirmed in scope of work and installation method described correctly
- Joint prep process described: routing, cleaning, and priming included, not just fill-and-go
- Certificate of insurance provided and verified: $1M+ general liability minimum
- References from pool deck joint work in San Antonio available on request
- Written scope of work lists all joints to be addressed, material specified, and warranty on labor
Use this table as your reference for any pool deck joint situation. Each row covers the correct specification or repair approach for that joint type in San Antonio's climate.
| Joint type or situation | Correct specification | Sealant material | Maintenance interval |
|---|---|---|---|
| Coping isolation joint (new install) | 3/4" to 1" wide, full perimeter, backer rod plus polyurethane | Self-leveling polyurethane or polyurea | Inspect annually; reseal every 2 to 3 years |
| Field expansion joints (new deck) | 6 to 8 ft on center both directions, 3/4" wide minimum | Self-leveling polyurethane | Inspect annually; reseal every 2 to 3 years |
| Existing joint reseal (sealant cracked only) | Remove old sealant, clean, prime, backer rod if missing, reseal | Polyurethane with primer | Next reseal in 2 to 3 years |
| Existing joint reseal (adhesion failure) | Full removal, wire brush both joint faces, primer mandatory, new backer rod | Polyurethane or polyurea with primer | Next reseal in 2 to 3 years minimum |
| Mid-slab crack between joints | Rout crack to uniform width, clean, install backer rod, reseal. Consider cutting additional control joints near crack. | Polyurethane crack sealant | Monitor every 6 months; reseal at first sign of reopening |
| Coping separation from pool shell | Remove rigid mortar fill, reset coping, install foam backer and polyurethane at joint before final set | Polyurea or polyurethane (high elongation) | Inspect every fall season |
| Slab heave adjacent to pool | Professional assessment required. Possible mudjacking before joint work. Do not reseal over a heaved slab. | After slab correction: polyurethane or polyurea | More frequent monitoring: every 6 months first year after repair |
- Isolation joint specified at full coping perimeter: 3/4 to 1 inch wide, no rigid fill
- Field joint spacing confirmed: 6 to 8 feet on center in both directions across the deck
- Base preparation specified: 4 to 6 inches of compacted crushed limestone under all slab sections
- Slab thickness confirmed: 4 inch minimum for residential pool decks in San Antonio
- Drainage slope confirmed: 1/8 inch per foot away from pool shell and away from structure
- Contraction joints tooled or saw-cut within 24 hours of pour on all large slab sections
- Backer rod included in scope: closed-cell foam, diameter 25% wider than joint opening
- Sealant specified: self-leveling polyurethane (standard) or two-part polyurea (premium)
- UV-stable grade confirmed for South Texas exposure conditions
- Primer included for porous concrete or previously sealed surfaces
- Shape factor confirmed: sealant depth equals half the joint width
- No silicone, acrylic, latex, or rigid mortar in any expansion or isolation joint
- Slab structural condition confirmed before resealing: no hollow sections, no significant heave
- Old sealant fully removed: routing or grinding if sealant is bonded, not just scraping surface
- Joint walls cleaned: wire brush plus compressed air blowout plus primer
- Backer rod condition checked: replace if compressed, contaminated, or missing
- Any new cracks routed and treated before field joint reseal begins
- Sealant product and grade named in writing in the scope of work
- Backer rod installation confirmed in scope
- Joint prep process described in quote: routing, cleaning, and priming included
- Certificate of insurance received and verified: $1M general liability minimum
- References from San Antonio pool deck joint work confirmed available
- Warranty on labor confirmed in writing: minimum 1 year on reseal work
- Annual inspection scheduled: September or October before first cool weather of the season
- Reseal interval marked on calendar: every 2 to 3 years for polyurethane, every 3 to 5 years for polyurea
- Drainage slope reconfirmed after any significant landscaping change or soil disturbance
- Tree planting restricted to 10 feet or more from any pool deck slab edge
Get a free pool deck assessment in San Antonio
Tell us about your pool deck situation, whether it is new construction, joint repair, or a failing deck that needs a professional eye. We will visit your property, assess the joints and slab, and give you a detailed written quote at no cost.